Create Sticky Columns in Fluid Engine

Pin this post to Pinterest! ☝🏻
One of my favorite ways to jazz up a site is with sticky columns. It's a quick and easy way to break free from a Squarespace template and really make your website stand out from everyone else.
People land on your site and think, "Man, they really have it together" and then assume that your product or service is the same quality as your website. It's funny how the two go hand in hand.
Sticky columns are a GREAT way to achieve a high end look. You can create them using fluid engine or the classic editor in Squarespace.
WHAT IS A STICKY COLUMN?
A sticky columns is a block of text in a column that remains "stuck" in place while you scroll down the page. It creates a split screen effect while you're scrolling until you reach the bottom of that section.
Here it is in action:

This post will show you had to add sticky columns for -
Fluid engine
Classic editor
Product descriptions
The examples in this post use text as the sticky blocks, but the exact same process works to make an image sticky. Just use the block ID for the image instead of a block ID for text.
IMPORTANT: The text that you want to stick should only be ONE text block. If you have two text blocks stacked on top of each other (like a heading and paragraph), combine them into one block.
WHEN YOU SHOULD USE STICKY COLUMNS
Sticky columns are good when you have two columns of text and one column is substantially longer than the other one... like in the example above. There is a lot of empty space under "What we offer". If we didn’t make that text sticky, you would just see empty space as you scroll down that section.
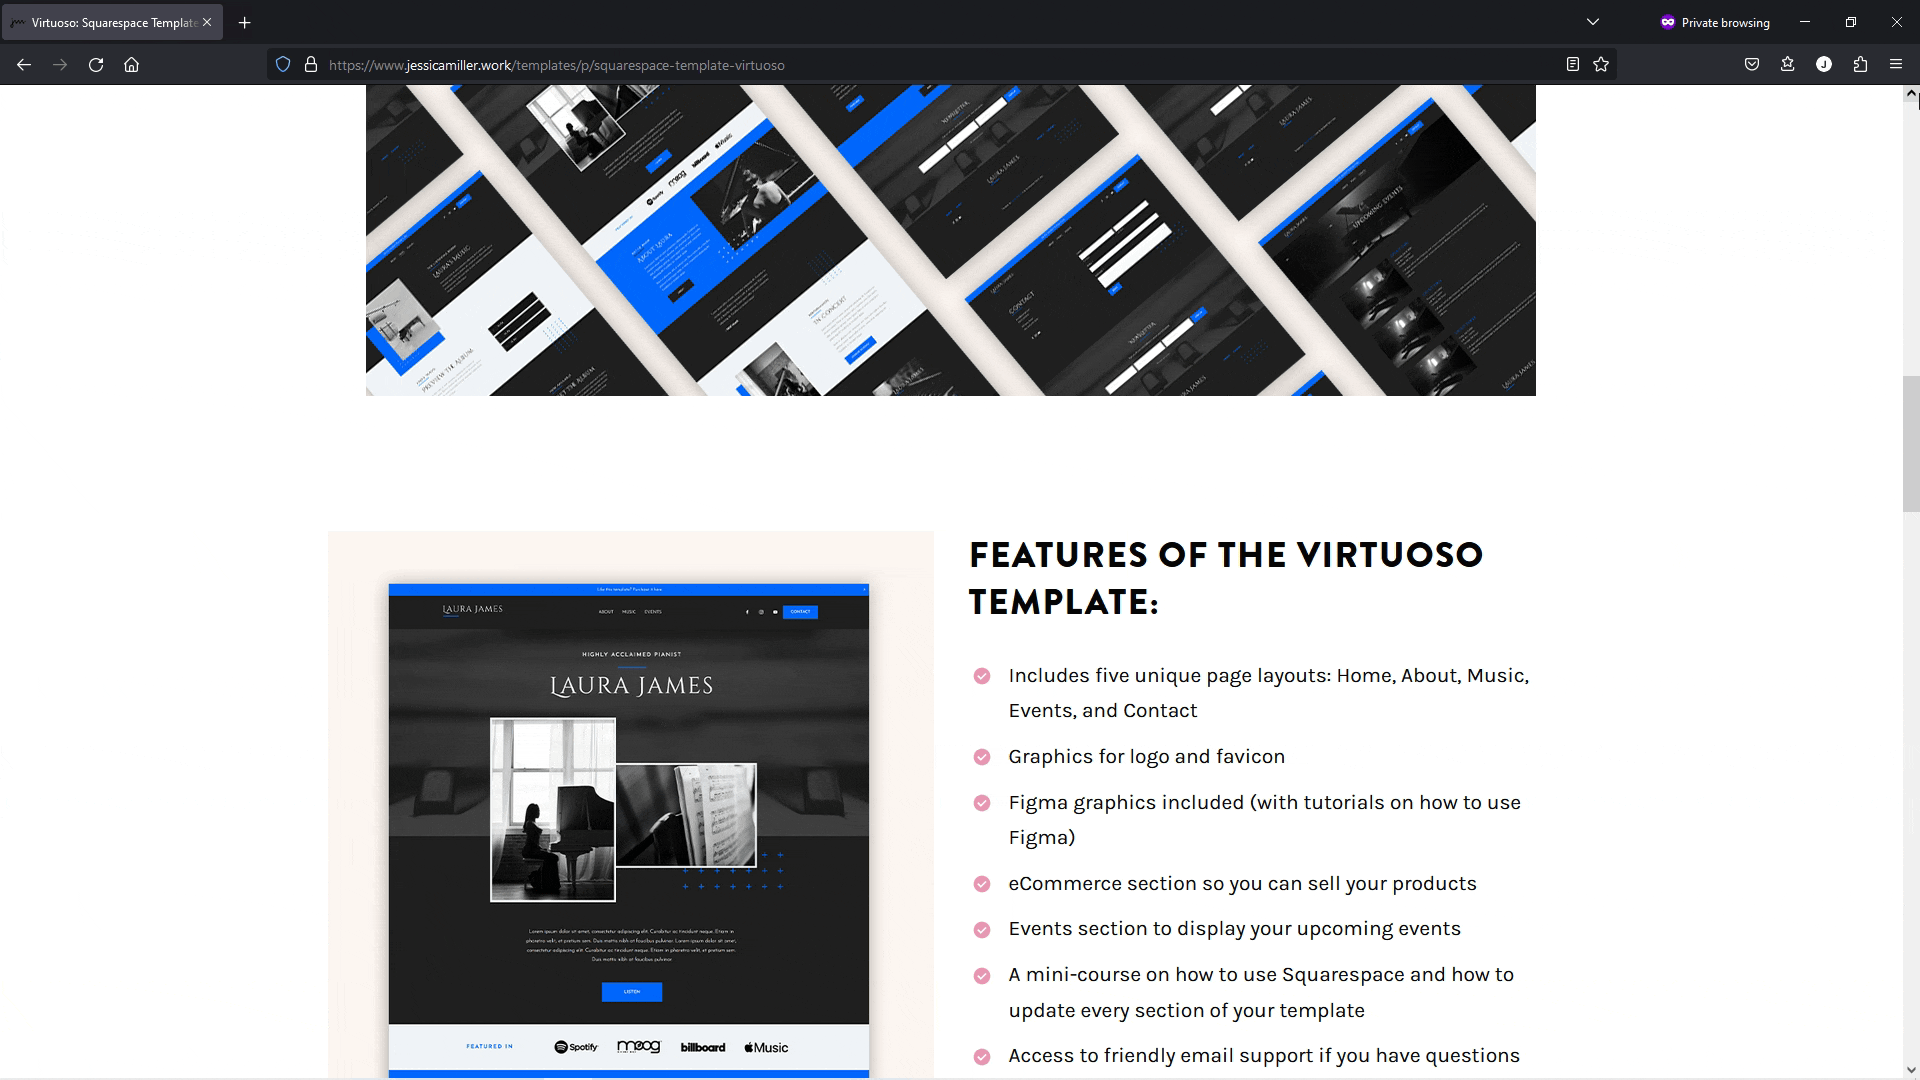
I also use it for my website template product descriptions (see it in action here). The image of the template is quite lengthy, so I made the text with the features sticky so that people can still read the text while they're scrolling through the image (see below).
HOW TO CREATE STICKY COLUMNS IN FLUID ENGINE
STEP 1:
Here is the code you will need. Copy this code and go to Website -> Website Tools -> Custom CSS and paste it there.
//create sticky column//
@media screen and (min-width:768px) {
body:not(.sqs-edit-mode-active)
.fe-YOURBLOCKID {
  position: -webkit-sticky; /* Safari */
  position: sticky;
  top: 100px;
}
}
Here it is explained:
@media screen and (min-width:768px) - This tells it to only make this text stick when someone is using a screen larger than 768px; in other words, NOT a mobile device. This would look wonky on a mobile device, so we only want it to work on a desktop.
body:not(.sqs-edit-mode-active) - This line is to make sure that the text looks normal when you're in edit mode.
.fe-YOURBLOCKID - This is the block ID of the text that is going to be sticky. The beginning part "fe" tells you that it is a Fluid Engine block.
position: -webkit-sticky; /* Safari */ - This code makes sure that it works in Safari.
position: sticky - This tells the block to 'stick'.
top: 100px - This is how far down from the top you want the text to appear. You can adjust this number.
STEP 2:
Now, open your page in Chrome and run the Chrome ID extension. Click on the block ID of the text that you want to stick. Replace "YOURBLOCKID" in the code with your copied ID and REMOVE the # before the ID.

IMPORTANT: When you copy the block ID with the Chrome extension, it will copy the entire ID, including the "#". Be SURE to remove the "#" once you paste the ID into the code, otherwise it will not work. This only applies to fluid engine. If you are using the classic editor, you will need the "#" - keep reading for that.
You may want to adjust the number in "top: 100px;" ... the smaller the number, the closer to the top the text will be. You can go as low as 0px, but do not remove this line of code.
Here is the way my code looks with my block ID (your code ID will be different).
//create sticky column//
@media screen and (min-width:768px) {
body:not(.sqs-edit-mode-active)
.fe-block-yui_3_17_2_1_1701802710844_5448 {
  position: -webkit-sticky; /* Safari */
  position: sticky;
  top: 100px;
}
}
STEP 3:
Hit save and you should have a functioning sticky column now! If not, keep scrolling to read the Troubleshooting section below.
Psst: Not sure about all of this CSS stuff? Download this free guide below! 👇

HOW TO CREATE STICKY COLUMNS IN CLASSIC EDITOR
STEP 1:
This is almost the exact same as above, with the exception of the ID. Here is the code that you will need. Copy this code and go to Website -> Website Tools -> Custom CSS and paste it there.
//create sticky column//
@media screen and (min-width:768px) {
body:not(.sqs-edit-mode-active)
YOURBLOCKID {
  position: -webkit-sticky; /* Safari */
  position: sticky;
  top: 0;
}
}
STEP 2:
Now, open your page in Chrome and run the Chrome ID extension. Click on the block ID of the text that you want to stick. Replace "YOURBLOCKID" in the code with your copied ID. We don't need to alter the ID any since we are using the classic editor.
Here is the way my code looks with my block ID (your code ID will be different).
//create sticky column//
@media screen and (min-width:768px) {
body:not(.sqs-edit-mode-active)
#block-ac14c43ea93c37b18c25 {
  position: -webkit-sticky; /* Safari */
  position: sticky;
  top: 0;
}
}
STEP 3:
Hit save and you're good to go! If you're text isn't sticking, keep scrolling to read the Troubleshooting section below.

HOW TO CREATE STICKY COLUMNS IN A PRODUCT DESCRIPTION
This is a little more advanced than the previous two, but it is still very doable. If you have an eCommerce store, be sure to take advantage of the “additional info” section of the product listing and fill out the page a little more. On my product, I added more detailed information about the product, some additional images, some FAQ’s, and a few other things. If you have two columns, then you may want to make one of them a sticky column like I did.
STEP 1:
Copy this code and go to Website -> Website Tools -> Custom CSS and paste it there.
//create sticky column in product description//
@media screen and (min-width:768px) {
YOURSECTIONID .row:nth-child(9) .sqs-col-6:nth-child(2){
  position: -webkit-sticky; /* Safari */
  position: sticky;
  top: 0;
}
}
Here it is explained:
@media screen and (min-width:768px) - This tells it to only make this text stick when someone is using a screen larger than 768px; in other words, NOT a mobile device. This would look wonky on a mobile device, so we only want it to work on a desktop.
YOURSECTIONID - This is the section ID for the product description. The section ID is the same for ALL products. So you only have to install this code once and it will update every product.
.row:nth-child(9) - The "9" means the text that I want to stick is in the 9th row of the page. You will need to change this number so that it matches the row that your text is on.
.sqs-col-6:nth-child(2) - The "2" means that the text that I want to stick is in the 2nd column. If yours is in the first column, then change this to a "1".
body:not(.sqs-edit-mode-active) - This line is to make sure that the text looks normal when you're in edit mode.
position: -webkit-sticky; /* Safari */ - This code makes sure that it works in Safari.
position: sticky - This tells the block to 'stick'.
top: 100px - This is how far down from the top you want the text to appear.
STEP 2:
Go to your product listing page (for me, it is this page). Activate the Chrome extension ID finder and copy the section ID. Be sure you are copying the SECTION ID and not the Block ID of the text. Paste your section ID over YOURSECTIONID in the code.

STEP 3:
Now look and see which row the text is in that you want to stick. The easiest way to do that is to Edit the product and click Additional Info. That will open up a new window with the additional blocks that you've already added to that page.
I just use my house to hover over each row and count them until I get to the row with the text that I want to stick. For my page, it's the "Features of the Virtuoso Template" section; row 9 (see below).
Whatever row your text is on, put that number in the ".row:nth-child(9)" part of the code.

STEP 4:
If your text is in the second column, then you do not need to change anything. If it is in the first column, then change the "2" to a "1" in this line - ".sqs-col-6:nth-child(2)"
STEP 5:
Hit Save and you're all set!
Here is how my code looks with my ID -
//create sticky column in product description//
@media screen and (min-width:768px) {
section[data-section-id="64357853e27cba47a30731ad"] .row:nth-child(9) .sqs-col-6:nth-child(2){
  position: -webkit-sticky; /* Safari */
  position: sticky;
  top: 0;
}
}
TROUBLESHOOTING
Here are some things to keep in mind if you run into issues -
If your header is in a fixed position, you will need to add enough padding so that your text isn't hidden behind the header. To do this, increase the number in "top: 100px;" until it pushes the text down far enough so you can see it.
Be sure the text block for the sticky text is only ONE block. If you have two text blocks stacked on top of each other, it won't work.
For the product description, the code is the same for all products. So make sure the text that you want to stick is in the same row for all product descriptions (for my code above, all of my sticky text is in the 9th row of every product description).
Make sure you didn't leave a character out! Missing characters is the most common reason that code doesn't work.
If you used this code on your site, feel free to drop a link in the comments section to show it off!
*This post may contain affiliate links, so I may earn a small commission when you make a purchase through links on this site at no additional cost to you.