Tutorial: Create Animated Button On Hover

Pin this post to Pinterest! ☝🏻
Buttons are one of the most underutilized components on most websites.
I see tons of Squarespace websites with gobs of text and no call to actions (CTA). Getting traffic to your site is the hard part... once they're there, you want them to take action! Buttons are the way to make that happen.
I always recommend having a call to action button in the top header navigation. Whatever action you want people to take the most - book a call, shop your products, etc - that's what that button should be. It needs to propel them to take action, which in return increases conversions.
But you also need to have CTA buttons sprinkled throughout your site. It should be SUPER EASY for a customer to take action. They shouldn’t have to go hunt for a button to schedule an appointment with you.
Since buttons are what we're directing people too, they need to be eye catching. What better way catch someone’s eye than from a button that animates on a hover.
This blog post will show you the tutorial to create a button with an image that tilts 45 degrees when you hover over it. All it takes is a little CSS.
I'm even giving you the arrow image so you can use it yourself 👊
Psst: Not familiar with CSS? Download this quick guide first! 👇

STEP 1: CREATE YOUR ICON
Here's a link to the file in Figma. You can also create your own icon using another method. Once you open the file, click Duplicate to use it yourself. From there you can either -
Use the black arrow as I have it
Change the color of the same arrow
Or create a new icon using the Figma file.
There are directions in the file on how to do all 3 of those options.
STEP 2: INSTALL THE CODE
Here's the code you'll need. Copy the code then paste it by going to Website -> Website Tools -> Custom CSS
#siteWrapper .sqs-button-element--tertiary:not(div.sqs-add-to-cart-button)  {
display: inline-block;
  text-align: center;
  line-height: normal;
  font-size: 18px;

&:after {
  content: '';
  background-image:url(YOUR URL HERE);
  background-size:contain!important;
  background-position:center;
  float: right;
  background-repeat: no-repeat;
  color: transparent;
  object-fit: cover;
  width: 22px;
  height: 22px;
  margin-left: 15px;
  transition: all 0.4s ease-in-out 0s;
  -moz-transition: all 0.4s ease-in-out 0s;
  -ms-transition: all 0.4s ease-in-out 0s;
  -o-transition: all 0.4s ease-in-out 0s;
  -webkit-transition: all 0.4s ease-in-out 0s;
  }

&:hover:after {
   rotate: 45deg;
}

&:hover {
   opacity: 1 !important;
  }
}
I know that looks like a lot, but don’t let it intimidate you! Copying/pasting isn't any more difficult whether you're copying a lot or a little. You don’t have to know what all of that code means in order for it to work 😜
There are just a few things you'll need to tweak. Let me explain -
STEP 3: APPLY TO DESIGNATED BUTTONS
There are 3 types of buttons in Squarespace -
Primary
Secondary
Tertiary
This code will create the animated effect for all tertiary buttons. If you want to apply it to a different type of button, just change the word "tertiary" in that top line to either "primary" or "secondary”.

STEP 4: UPLOAD YOUR ARROW ICON
Click "Custom Files" just above the area where you pasted the CSS and click "Add images or fonts". Navigate to where you saved your icon and select it.
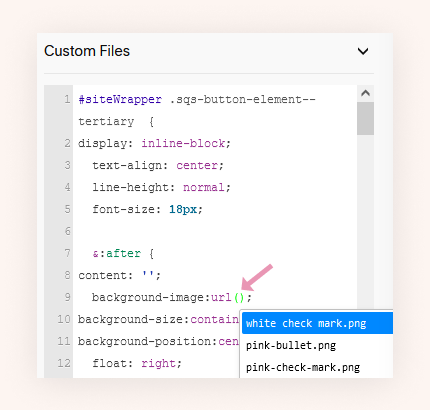
STEP 5: insert your background image url
Remove the text that says "YOUR URL HERE" and leave your cursor blinking in between the two parentheses. A list of images that you've already uploaded should appear. Choose the icon that you just uploaded.
*If the drop-down list does not appear, then click Custom Files again and select the icon you just uploaded.
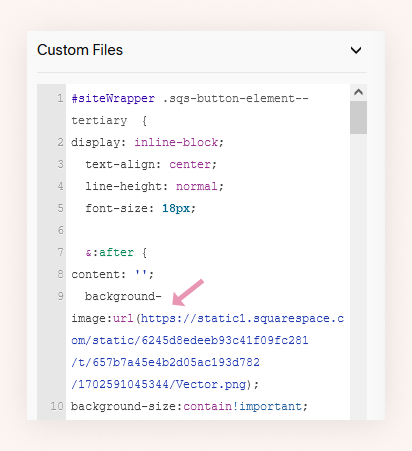
Now that you've selected your icon, your code should look similar to this -
STEP 6: MAKE ANY NECESSARY TWEAKS
Depending on your button size and font size, you may need to make some adjustments to a few sizes.
Adjust this to increase the font size -
font-size: 18px;
Adjust this to increase the width and height of the icon -
width: 22px;
height: 22px;
Adjust this to increase or decrease the space between your text and the icon -
margin-left: 15px;
IMPORTANT THINGS TO KNOW
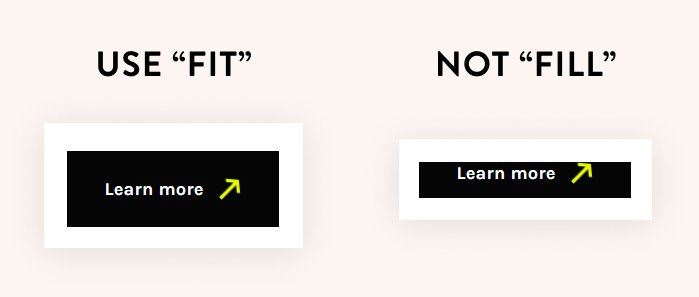
If you're working in fluid engine, be sure your button is set to "Fit" and NOT "Fill". To do this, double click the button, then click Design and choose Fit.
If you're using the classic editor, no changes are necessary.
When you're working in edit mode, you will notice that the buttons look like a hot mess. Don't panic! As soon as you save your work and exit out of edit mode, your buttons will return to normal.

I hope this tutorial was helpful! If you run into any issues, feel free to leave it in the comments and I'll reply. I'd love to see your new buttons by dropping a link in the comments 😊
*This post may contain affiliate links, so I may earn a small commission when you make a purchase through links on this site at no additional cost to you.