How To Create A Blog on Squarespace (Part 1)

Pin this post to Pinterest! ☝🏻
WHY YOU NEED A BLOG ON YOUR Squarespace WEBSITE
Without a doubt, the best way to get organic traffic to your website is through a blog. When you Google a question, guess what comes up in the search results? Blog posts. By creating relevant content, using SEO correctly, and posting consistently, you can start to rank at the top of Google.
Every day there are 8.5 BILLION searches on Google. Every day! That's 99,000 searches a second. That is mind blowing! 🤯
Casting a bigger net by showing up on Google will open you up to SO MANY more potential clients.
Even if you already have a Squarespace website, it's not too late to add a blog. Squarespace is such a great platform for blogging because everything is so simple and easy to navigate.
There is a LOT to cover when it comes to creating a blog (and doing it successfully) so this information is broken up into multiple posts.
TIP: You may want to wait until you have at least 5 blog posts before you make your blog live.
You don't want someone landing on your page, seeing 2 blog posts, and thinking, "This isn't very helpful...there's only 2 posts." You want to show people right off the bat that this is a helpful area for them to keep coming back to by having several posts in the vault.
If you decide to wait before you make your blog live, just move the blog down to the “Not linked” section.
HOW TO ADD A BLOG TO YOUR WEBSITE
STEP 1: In the Main Navigation section, click the plus sign and choose Blog

STEP 2: Choose any of these designs
It doesn't really matter which one you choose because we’re going to change it in the settings later.

STEP 3: Name your blog and hit Enter
Name your blog “Blog”.

STEP 4: Click the gear icon to set up the settings
Name your page title "Blog", your navigation title “Blog”, and change the url slug to say /blog. You’ll also want to set the posts per page to 20.

STEP 5: Click Close
The rest of the settings are fine for now, so click Close.

CUSTOMIZE THE BLOG LAYOUT
Click the Blog so that it opens up the page with all of the blog posts. We need to add two sections above the blog posts and change the settings so that our page looks like this -

STEP 1: Add a blank section for the top of the page
My top section has a background image, a text block, and a code block with the opt in form from Flodesk. (This post explains how to create an opt in form. Use this link to get 25% off of your first year.)
Feel free to add whatever elements you need to this block, but at the minimum you'll probably want to add a text and image block.

STEP 2: Add a blank section for Categories and Search Bar
For this section, add a text block and a search block. List your categories that you want displayed.

Now we need to create hyperlinks for the categories. Highlight the text and click the link icon. Select the /blog page, select the category, and then click Close.

Do this for the rest of the category links.
Next, double click the Search bar. It will search your whole site unless you check the "Search Specific Page" box. I have mine set to search my blog posts only.

STEP 3: Change the blog layout settings in the blog section
Click Edit Settings in the blog section and change the layout to Masonry Blog, then update the rest of your settings to match these -


STEP 4: Remove the blog titles
Since I have the blog title in my image, I don’t need it beneath the image as well. Here is some simple code to remove the blog title from appearing under the image. Go to Website -> Pages -> Website Tools -> Custom CSS and paste the code below in the box. Then click Save.
// Remove title from blog summary //
.blog-title {
    display: none;
}
CREATE YOUR FIRST BLOG POST
STEP 1: Remove the default blog posts
Squarespace automatically loads a few blog posts into your blog, so you'll want to remove those dummy posts. Just click the check box, then click Delete at the bottom.

STEP 2: Click the plus sign to create a new post
STEP 3: Compose the post
Enter the title and the content of your post. Click the blue plus sign to add a block. You have all the same options of blocks to add here as you do in a regular page that you're creating.

When you're writing a blog post, be sure to incorporate headers for each section. When Google's bots crawl your site, they're going to be looking for distinct header and paragraph sections. They know that this makes it easier for the reader to read, and that is going to help you rank higher.
Theoretically, your blog post title should be an h1 (Heading 1) tag, and it should be the only h1 on the page. Use h2 or h3 for the headers of each section in your blog post.
CUSTOMIZE THE SETTINGS OF YOUR BLOG POST
Now that you have some text on the page, let's customize the settings. These settings will effect ALL of your blog posts. Here are the settings that I use on my blog, but feel free to make it your own -

Content Width: This is the width of the content on the page. I don't recommend making it too wide because it's harder on our eyes to read long strings of text left to right.
Text Alignment: You can align your title either left or center. This only effects the title.
Meta Position: Meta includes the options listed below here (categories, date, etc). You can choose to turn these on/off and whether you want them above or below the title.
Delimiter Style: This is the little character between the meta options. I have mine set to pipe, which is the little pipe between the categories above the title (How To | Squarespace | CSS). You can also choose bullet, dash, and space.
Header Spacing: This refers to the spacing between the title and the content beneath it.

CUSTOMIZE THE COLORS
Switch over to the Colors tab of the settings to choose which color theme you want to use. This will effect every blog post.

EDIT THE BLOG POST SETTINGS
Before you hit Publish, we need to adjust a few settings. Click the 3 little dots next to your blog post and click Settings.
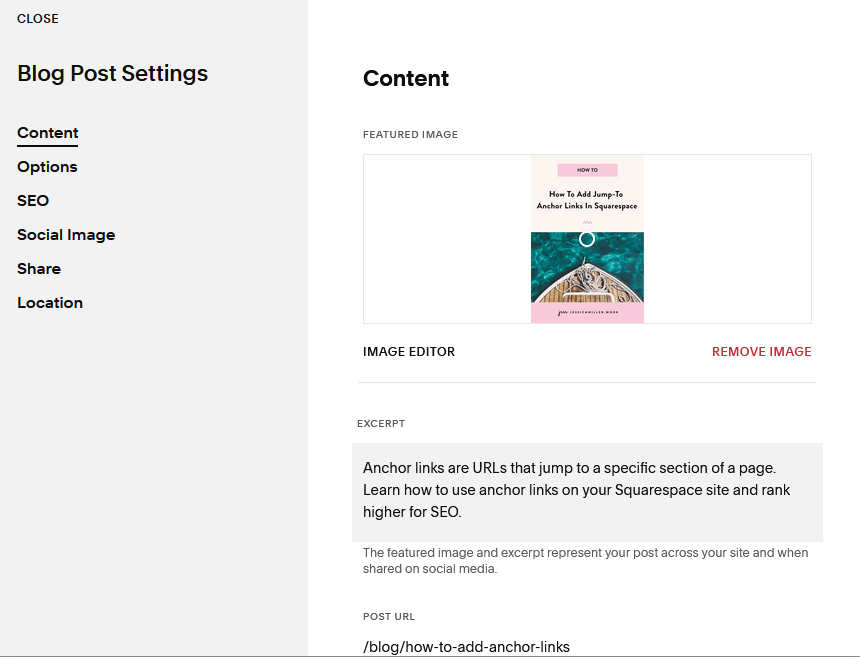
CONTENT:
Featured Image: This is the image that is used when you use a summary block so be sure to upload an image here. My images are 550x825. If they’re too big, they’ll negatively impact SEO.
Excerpt: Write a short sentence or two describing your blog post. This will be used if you share it on social media.
Post URL: The URL should be a few words and should represent what the post is about. Separate each word with a hyphen. For example, if my blog title was "How to Add Jump-To Anchor Links in Squarespace", then I would make my url /how-to-add-anchor-links. It’s not quite as many words, but still gets the point across.
Author: Unless you have multiple authors, this will be your name.
Source URL: I usually leave this blank
Duplicate
Delete
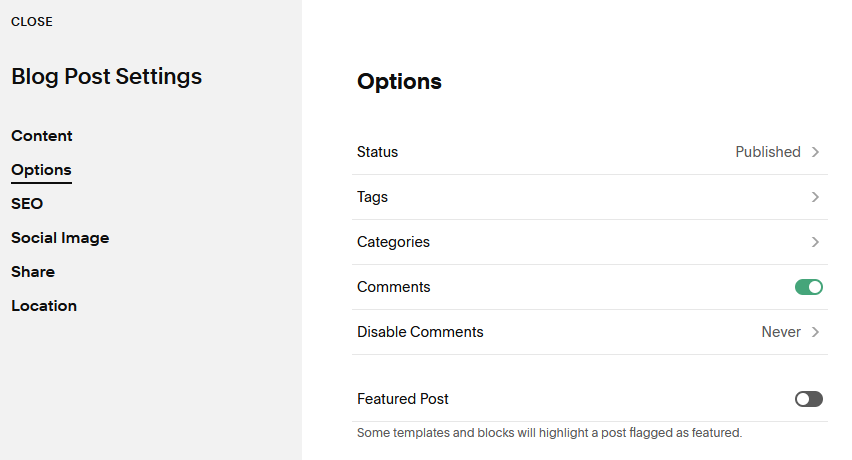
OPTIONS:
Status: This is where you'll publish your post or schedule it to post in the future. If you need to deactivate a post that's already published, just put it back into the draft status.
Tags: Give keywords to certain blog posts. My tags for a blog post on ranking on Google might include "google search console", "google crawler", "google sitemap" and more.
Categories: This is more of a high level 'tag'. For example, my categories for all of my blogs are Squarespace, CSS, How To’s, and Business. Every post will fall into one of those categories so that users can select a category to see all blog posts in that category.
Comments: Turn on or off comments.
Disable Comments: You can always allow comments or set them to turn off after a certain time.
Featured Post: Mark a post as featured. You can use summary blocks to display posts that are featured, like if you have a 'most popular blog post' section.

SEO:
SEO Title: The title will pull from the title you gave your post, but you can override it with another title here.
SEO Description: I recommend giving an SEO description so that you'll rank higher. Be sure it's between 50-300 characters.
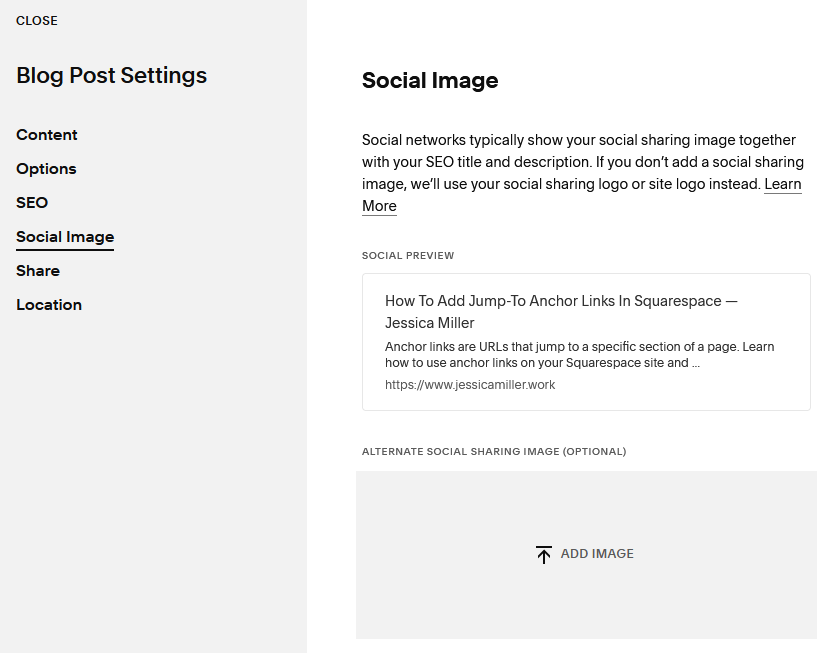
SOCIAL IMAGE:
Alternate Image: Upload the image you would like displayed when you share the post to social media. If you don’t put one, then it will use the image you added in the Content section.

SHARE:
Email: You can send the blog post out as an email through Squarespace.
Social Media: Connect social media and Google Search Console to automatically push your blog out when it's published.

LOCATION:
Address: Add a location
CREATE A BLOG POST TEMPLATE
Creating a template will save you LOADS of time. I have lots of different sections in my blog posts. I have an image to pin to Pinterest, the body of the post, a table of contents, lead magnets, affiliate link text, a blurb about me, and a summary block of related blog posts. It would take me FOREVER to recreate this every time I create a blog post. So instead, I created a template of all of the blocks.
It’s also easier than duplicating a published blog post and replacing the content. A published blog post will have many sections of text and images that it would take forever to delete all of that. So, your best bet is to create a template.
I leave the template as a draft, then when it's time to write a blog post, I simply duplicate the template, edit it, and move my lead magnets so that they're within the body of the text (instead of at the bottom of the page). Here's what my template looks like -

And that’s it! You now have a customized blog page and hopefully a few blog posts written.
In the next few posts we’ll cover how to have an effective blog, my step-by-step blogging process, where to get blog ideas from, and much, much more.
Missed a post in the series? Here’s all of them:
Part 1: How To Create A Blog on Squarespace
Part 2: My Complete Step-By-Step Blogging Process
Part 3: 3 Elements Every Blog Post Should Include
Part 4: 12 Tips Every Blogger Should Know
*This post may contain affiliate links, so I may earn a small commission when you make a purchase through links on this site at no additional cost to you.