3 Elements Every Blog Post Should Include (Part 3)

Pin this post to Pinterest! ☝🏻
In order to have an effective blog that keeps readers engaged with your website, you’re going to need more than just words on a page. Most people don't read text anyways, so by adding other elements into the page, it will break the text up into smaller chunks of words that are easier to read.
There are 3 key elements that I include in every blog post:
Lead Magnets
An "About" Section
A “Related Blog Post” Section
Thankfully, Squarespace makes these really easy to add by using Summary Blocks. I'm going to walk you through how to set each one of these up, as well as explain why you should incorporate them in every blog post.
LEAD MAGNET:
What is a lead magnet, you ask? Good question. A lead magnet, also called a lead generator, is a free resource that you give someone in exchange for their email address. This could be anything from a helpful PDF, to a free webinar, to a discount code on a product or service.
The number one way to grow your business is through email marketing. How do you get the names of people to email? Through lead magnets!
I see people make this mistake all the time - they put a form on their website for people to sign up for their newsletter, thinking people are actually going to fill it out.
Guess how successful that is?? It's not.
People are bombarded every day by marketing emails. Every morning I have about 20 waiting for me in my inbox. No one is going to willingly sign up to get on yet another mailing list.
But give them something helpful in return? That's a different story. Let’s say someone has a PDF called "My 3-Part Email Sequence to Re-Engage Your Email List" then, hands down, I'm signing up for that.
I know they’re going to start sending me emails once I sign up, but a) it's worth it because I know I'm getting something useful in return and b) if this PDF is useful, then there's a high chance the emails they’re going to send me will be useful too.
We always want to show customers value. More value = more trust = more sales.
For my website, I have 3 lead magnets -
Beginner's Guide to CSS (most popular)
You'll notice that I scatter them throughout every blog post (even this one). That not only helps to break up the content and add color, but it also provides readers with something helpful and gets them on my mailing list (where I can give them even more helpful tools).
Here's how to create the lead magnet images that go in the blog post:
STEP 1: CREATE THE GRAPHIC
I created my images in Photoshop, but Figma and Canva are great options too. My images are 1000x500px.
I always suggest creating an image that has a button in it. Once it’s set up, the entire image will be clickable, but by putting a button on the image, it indicates to people that they need to click something. I also have the words "FREE" lightly appearing in mine so that it's obvious that they don't need to pay for this resource.
Also, by showing images of the item, people are more likely to sign up.

STEP 2: CREATE A NEW BLOG COLLECTION
Would you believe these lead magnet blocks are actually a blog within a blog? 🙂 In the "Not Linked" section, click the plus sign and click Blog. On the next screen, click any blog layout - it won't matter because we aren't going to use this.

Name your blog collection. I named mine "CTA graphics for summary blocks". "CTA" stands for "Call to Action". Here are the settings that I use for mine (click the gear icon to get to the settings) -

STEP 3: DELETE THE PREFILLED BLOG POST
Squarespace will prefill your blog collection with dummy blog posts. Select each post and click the red Delete button at the bottom.
STEP 4: CREATE A NEW BLOG POST
Click the plus sign to add a new blog post and name the post the same name as your lead magnet. Click Publish when you're done.
STEP 5: CUSTOMIZE THE SETTINGS
Click the 3 dots and click Settings.
First, click Add Image and upload the image you created in Step 1.
Leave the Excerpt blank.
Type your URL. Mine is 5-ways-your-website-is-costing-you-money. This won't really matter because we won't be using it, but still - it should be relevant to your lead magnet title.
The Source URL is important! This URL is the page that your lead magnet resides on. Whichever page your form for the lead magnet is on, that's what you'll put here. If your form isn't on a landing page (like, if it's on the home page), then you can create an anchor link to the form and put the anchor link here in the Source URL.
Be sure to toggle on the "Link Post Title to Source URL" because this is what will link the lead magnet image to the page where our lead magnet form is.

STEP 6: ADD A TAG
This is an important step because we will use this tag in Step 7. With the Settings still open, click Options, then Tags. Type in a tag and hit Enter. No one will see the tag, so name it whatever you want.
Click Close once you're finished. If you have multiple lead magnets, then repeat Steps 4, 5, & 6.
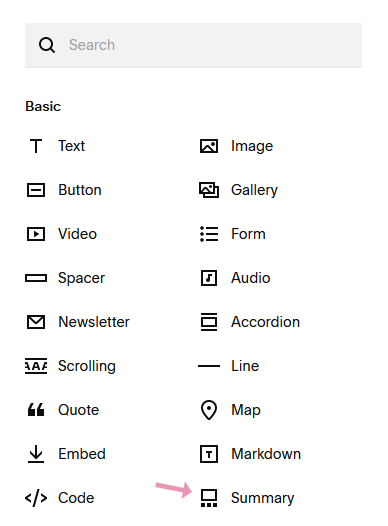
STEP 7: ADD A SUMMARY BLOCK
If you're using a template for your blog (highly recommend it!), then go to your template and click Edit. Otherwise, create a new blog post. Click the blue dot to add a summary block.
Create one summary block per lead magnet.
STEP 8: CUSTOMIZE THE SUMMARY BLOCK SETTINGS
Click Select a Page and choose your blog collection with the lead magnet images.

Click Back.
Click Filter Items, click Tag, and select the tag for your lead magnet image.
Click Back.
Click Design.
Select Wall, 1 item displayed, and turn off Title and Excerpt.

Scroll down and click Size and Spacing. I have my Column Width to the max (600px) and Gutter Width at 60px.

Repeat Steps 7 & 8 if you have multiple lead magnets.
And you're all set! Once you've hit Save you can test it out.

CREATE AN 'ABOUT' SECTION
I think it's helpful to have a section at the bottom of each blog post explaining who you are. You never know what page someone is going to land on when they come to your site. Just because you have an About page on your site doesn't mean they've seen it. They may have clicked on your blog post from Google, and that post is their introduction to you.

Creating an About section not only allows people to get to know me a little bit, but it also gives people an opportunity to reach out to me through email, a contact form, or by booking a call. It's just another way to be helpful to people and give them what they need without them having to search for it.
Now you might be thinking, "Can't I just insert a text block and type the information in"? You can. But there's a better way.
I set mine up as a summary block (just like we did the lead magnets). Let's say I write my ‘about’ section, but later I want to change part of the text in that section. If I was using a text block for that, I would have to go to EVERY SINGLE blog post and update the text.
That would take FOREVER.
Instead, by using a summary block, it's pulling that information from ONE place. So all I need to do is update that one section, and then it will update the section on ALL of my blog posts.
The steps for this are almost identical to the steps we just did for the lead magnet.
STEP 1: CREATE A NEW BLOG POST
Go to the blog collection you created above for the lead magnet. The About section will be housed in the same blog collection as the lead magnets. Create a new blog post and enter the title.
This time, you can leave the image blank and type in the text for your 'about' section in the Excerpt.

Next click Options, then Tags and type in a tag. Mine is just 'about'.
Click Close.
STEP 2: INSERT A SUMMARY BLOCK
Just like we did for the lead magnets, go to your blog post (hopefully your template) and insert a summary block.
STEP 3: CUSTOMIZE THE SETTINGS
The settings will be the same except the Elements section. Only turn on the Title and Excerpt.

And you're done!
STEP 4: BONUS - MODIFY FONT WITH CSS
This isn't necessary, but you may want to edit the font size. Mine was quite small and I wanted to make it a little larger. To paste the code, go to Website -> Pages -> Website Tools -> Custom CSS. You will want to adjust the font family, size, and weight to the font on your own site -
//about section at bottom of blog posts//
.sqs-block-summary-v2 {
  .summary-excerpt p {
font-family: karla;
    font-size: 18px !important;
font-weight: 500;
} }

CREATE A related blog post SECTION
I see a lot of people that use a text block to list other relevant blog posts. I used to do this when I first started blogging (you can see it in my older blog posts).
This isn't necessarily bad, it's just more work than you need to do. Here are the cons to using a text block to list related posts:
You have to manually list the blog posts in this section. They don't auto populate.
They won't be relevant for long. When someone reads a blog post that you wrote a year ago, the blog posts that you have listed at the bottom are going to be other blog posts that you wrote a year ago.
It's just text. Images are eye catching and are more likely to be clicked than a text link.

The pros for using a summary block for related blog posts are:
People are more likely to click on images
Most recent blog posts show up first
You can filter that section so that the posts that appear are relevant to the post they're currently reading.
Again, you're going to see a lot of similarities in these instructions as the Lead Magnet and About sections.
STEP 1: CREATE A SUMMARY BLOCK
In your blog post (or template), click the blue plus sign to add a summary block.
STEP 2: CUSTOMIZE THE CONTENT SETTINGS
Click Select a Page and select your blog (not the blog collection with your lead magnets/about section, but your actual blog).

Click Back.
Primary & Secondary Metadata will be "None".
Click Filter. This is where you can filter by categories and tags based on what the blog post is about. We talked about categories and tags in Part 2 of this series.
If I have a blog post about CSS, then I want the blog posts in the "More content like this" section to be about CSS as well. In that case, I would click Filter and select the CSS category.
Click Back.

STEP 3: CUSTOMIZE THE DESIGN SETTINGS
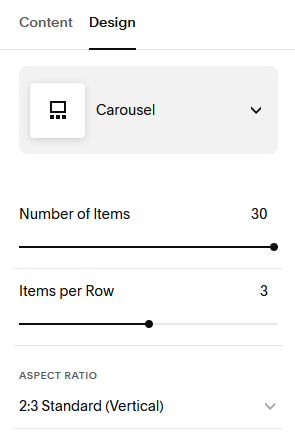
Click Design.
Choose Carousel for the layout. Increase the number of items to the maximum. I like to show 3 items per row, otherwise they start to get too small if you do more than that.
Choose the aspect ratio. My images are 2:3 Standard (Vertical), but yours may be something different.
Choose your font size and alignment.
You can change the header text from "Featured" to something else, like "You might also like..." or “Related blog posts”. Mine is "More content like this..."
I only turn on the featured image and turn off the rest of the settings. Since I have my title in the image, I don't need it displayed again.

STEP 4: BONUS - MODIFY THE TITLE WITH CSS
Just like we did in the About section, I added some CSS to change the Title of the section. Mine was rather small, but now it matches the other titles on my site. This will also effect the title in the About section.
To paste the code, go to Website -> Pages -> Website Tools -> Custom CSS. You will want to adjust the font family, size, and weight to the font on your own site -
//more content like this section at bottom of blog posts//
.sqs-block-summary-v2 {
.summary-heading, .summary-title, {
font-family: brandon grotesque;
font-weight: 800;
font-size: 22px !important;
text-transform: uppercase;
} }
So, how does it look? At this point you should have your Lead Magnets, an About section, and a Related Blog Post section set up.
Your blog is so much more robust than it was at the beginning of this post! If you added any of these to your blog, send me a link so I can check it out. I would love to see it.
Missed a post in the series? Here’s all of them:
Part 1: How To Create A Blog on Squarespace
Part 2: My Complete Step-By-Step Blogging Process
Part 3: 3 Elements Every Blog Post Should Include
Part 4: 12 Tips Every Blogger Should Know
*This post may contain affiliate links, so I may earn a small commission when you make a purchase through links on this site at no additional cost to you.